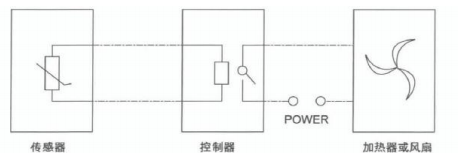
") 如何通過(guò)使用加熱器和風(fēng)扇調(diào)節(jié)任何溫室的濕度和溫度
如何通過(guò)使用加熱器和風(fēng)扇調(diào)節(jié)任何溫室的濕度和溫度
步驟1:設(shè)置字符LCD
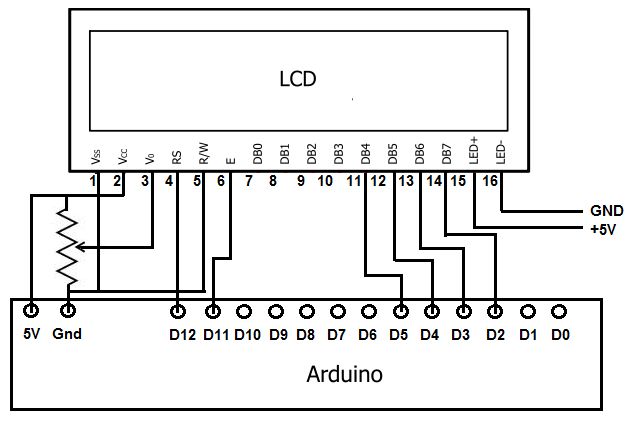
這是該項(xiàng)目接線中最棘手的部分。上圖顯示了LCD的每個(gè)連接如何連接到Arduino。使用正/負(fù)面包板導(dǎo)軌進(jìn)行設(shè)置要容易得多,但是我沒(méi)有一個(gè)可用的導(dǎo)軌。在我的設(shè)置中,我在引腳3和引腳1之間使用了電位計(jì),因?yàn)樗梢暂p松調(diào)節(jié)背光。但是,這不是必需的,一個(gè)10K電阻將代替它工作。
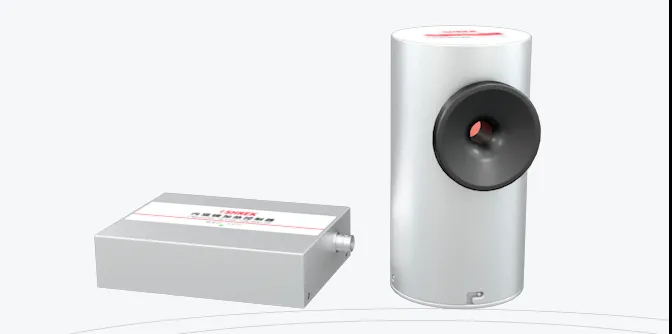
步驟2:連接濕度和溫度傳感器
設(shè)置兩個(gè)非常簡(jiǎn)單為此使用了單獨(dú)的傳感器,但是我使用了一個(gè)同時(shí)讀取濕度和溫度的傳感器。 DHT傳感器價(jià)格便宜,能夠讀取溫度和濕度。它們有四個(gè)引腳,其連接方式如下:
VCC(3V-5V電源)
數(shù)據(jù)輸出
無(wú)連接
接地
在VCC和數(shù)據(jù)線之間也連接一個(gè)10K電阻。上方顯示一個(gè)圖。
要使用DHT傳感器,您需要下載DHT庫(kù)。這是Adafruit的一款。為了使用它,請(qǐng)下載DHT.cpp和DHT.h文件,并將它們放在arduino“ libraries”文件夾中的“ DHT”文件夾中。
以下是adafruit的DHT傳感器示例代碼:
// Example testing sketch for various DHT humidity/temperature sensors
// Written by ladyada, public domain
#include “DHT.h”
#define DHTPIN 2 // what pin we‘re connected to
// Uncomment whatever type you’re using!
//#define DHTTYPE DHT11 // DHT 11
#define DHTTYPE DHT22 // DHT 22 (AM2302)
//#define DHTTYPE DHT21 // DHT 21 (AM2301)
// Connect pin 1 (on the left) of the sensor to +5V
// NOTE: If using a board with 3.3V logic like an Arduino Due connect pin 1
// to 3.3V instead of 5V!
// Connect pin 2 of the sensor to whatever your DHTPIN is
// Connect pin 4 (on the right) of the sensor to GROUND
// Connect a 10K resistor from pin 2 (data) to pin 1 (power) of the sensor
// Initialize DHT sensor for normal 16mhz Arduino
DHT dht(DHTPIN, DHTTYPE);
// NOTE: For working with a faster chip, like an Arduino Due or Teensy, you
// might need to increase the threshold for cycle counts considered a 1 or 0.
// You can do this by passing a 3rd parameter for this threshold. It‘s a bit
// of fiddling to find the right value, but in general the faster the CPU the
// higher the value. The default for a 16mhz AVR is a value of 6. For an
// Arduino Due that runs at 84mhz a value of 30 works.
// Example to initialize DHT sensor for Arduino Due:
//DHT dht(DHTPIN, DHTTYPE, 30);
void setup() {
Serial.begin(9600);
Serial.println(“DHTxx test!”);
dht.begin();
}
void loop() {
// Wait a few seconds between measurements.
delay(2000);
// Reading temperature or humidity takes about 250 milliseconds!
// Sensor readings may also be up to 2 seconds ’old‘ (its a very slow sensor)
float h = dht.readHumidity();
// Read temperature as Celsius
float t = dht.readTemperature();
// Read temperature as Fahrenheit
float f = dht.readTemperature(true);
// Check if any reads failed and exit early (to try again)。
if (isnan(h) || isnan(t) || isnan(f)) {
Serial.println(“Failed to read from DHT sensor!”);
return;
}
// Compute heat index
// Must send in temp in Fahrenheit!
float hi = dht.computeHeatIndex(f, h);
Serial.print(“Humidity: ”);
Serial.print(h);
Serial.print(“ % ”);
Serial.print(“Temperature: ”);
Serial.print(t);
Serial.print(“ *C ”);
Serial.print(f);
Serial.print(“ *F ”);
Serial.print(“Heat index: ”);
Serial.print(hi);
Serial.println(“ *F”);
}
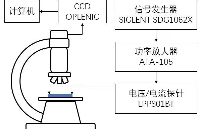
步驟3:測(cè)試字符LCD和DHT傳感器
上面是對(duì)Character LCD和DHT22傳感器的測(cè)試設(shè)置的詳細(xì)了解。加載到其上的代碼會(huì)定期顯示傳感器的濕度和溫度讀數(shù)。我將盡快上傳代碼。
責(zé)任編輯:wv
-
溫度傳感器
+關(guān)注
關(guān)注
48文章
2975瀏覽量
156390 -
Arduino
+關(guān)注
關(guān)注
188文章
6477瀏覽量
187833
發(fā)布評(píng)論請(qǐng)先 登錄
相關(guān)推薦
半導(dǎo)體濕法刻蝕設(shè)備加熱器的作用
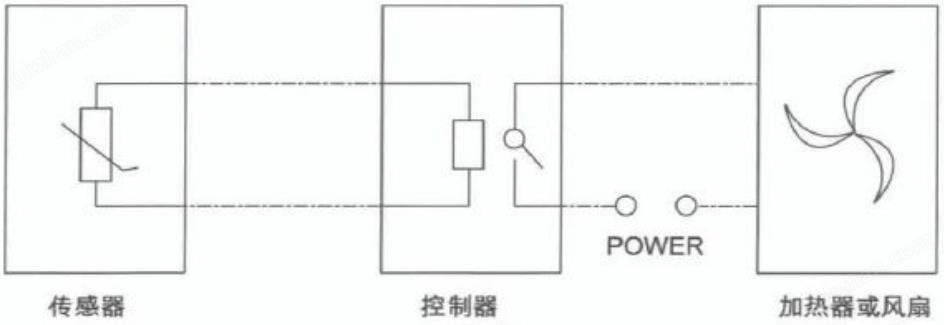
溫濕度控制器的功能和應(yīng)用
高壓加熱器自動(dòng)旁路保護(hù)裝置的作用
通過(guò)電池供電給TPA3116和風(fēng)扇,當(dāng)風(fēng)扇開(kāi)始工作,喇叭就有wenwen的噪聲,如何解決?
陶瓷ptc加熱器的優(yōu)缺點(diǎn)有哪些
TI濕度傳感器如何使用片上加熱器消除器件冷凝

功率放大器在微型加熱器中的應(yīng)用
內(nèi)窺鏡加熱器如何選擇紅外LED加熱光源

儲(chǔ)能柜內(nèi)溫濕度智能控制器 凝露控制帶通訊
安科瑞WHD72-22防止結(jié)露爬蟲(chóng)溫濕度控制器 用于設(shè)備內(nèi)部溫度和濕度調(diào)節(jié)
新能源PTC加熱器解決方案簡(jiǎn)介

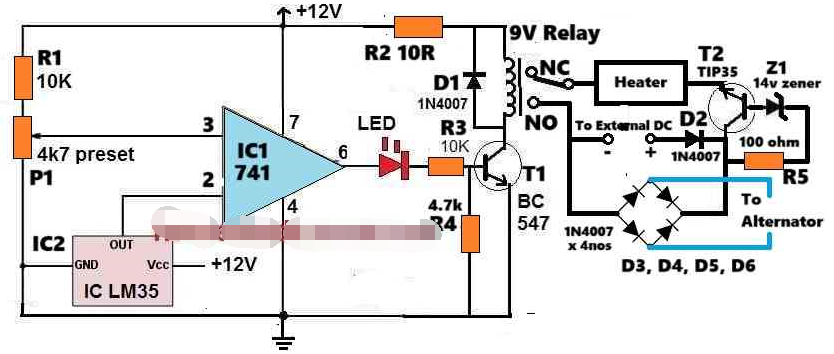
使用細(xì)銅線作為集成傳感器和加熱器進(jìn)行溫度控制
中高壓開(kāi)關(guān)柜、端子箱WHD系列溫濕度控制器
一個(gè)簡(jiǎn)單的汽車(chē)電池加熱器電路


 工商網(wǎng)監(jiān)
評(píng)論