 Xpedition與Pads Pro之間數據轉換的方法
轉換前準備:
1. Pads Pro原理圖和PCB數據必須保持同步(ForwardAnnotation)。
2. 確定兩個轉換環境的版本,不允許高版本向低版本轉換。
轉換步驟:
1. 中心庫轉換
a) 在Pads Pro 環境中,進入中心庫。
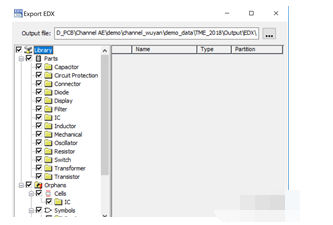
b) File》Export EDX… 選擇Library,并設置導出路徑,點擊OK即將中心庫以EDX格式導出。
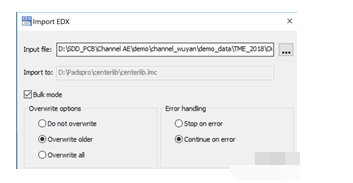
c) 在Xpedition環境中,先創建一個新中心庫,然后通過File》 Import EDX…,導入EDX文件,并勾選Bulk mode,點擊OK即完成中心庫的轉換。
2. 原理圖轉換
a) 在Xpedition環境中,先創建一個新項目,中心庫指向剛剛轉換好的中心庫。
b) File》Import》PADSProfessional。
c) 選擇需要轉換的prj文件。
3. PCB轉換
a) 通過Tools-》Xpedition Layout,進行前項標注,前項標注結束后保存數據。轉換完成。
Xpedition to Pads Pro
因為Pads Pro環境中對Xpedition中的某些數據信息并不支持,所以在轉換過程中,會自動刪除以下信息:
l Reuse Blocks
l Function Managed Variants
l ICX Constraints
l Electrical Constraints
ElectricalNets
Typical Impedance
EmbeddedClearances
Z-AxisClearance
AnalogNets
Buses
AutomatedTopologies
Virtual Pins
DelayFormulas
Max/MatchedTOF Delay
DiffPair Length Tolerance
DifferentialDelay
NoiseType
ParallelismNoise Rule
CrosstalkNoise Rule
相對比于Xpedition,Pads Pro不支持對以下目標的編輯,所以在轉換之前,需要在Xpedition環境中將以下目標刪除:
StackedParts
Cavities
Wirebonds
EmbeddedPassives
TargetAreas
BusPaths
如果在Pads Pro環境下并沒有RFlicense,轉換過程中,會自動刪除以“RFPART_”開頭的RF器件。
具體中心庫,原來圖和PCB的數據轉換過程,與上述的PadsPro to Xpedition轉換流程一樣,在此不再贅述。
責任編輯人:CC
-
PADS
+關注
關注
80文章
808瀏覽量
107948 -
Xpedition
+關注
關注
0文章
19瀏覽量
8466
發布評論請先 登錄
相關推薦
實現觸摸屏和PLC之間數據通信的方案
【轉換】Allegro轉換PADS教程詳解
基于改進演化算法的空間數據聚類方法
GML空間數據壓縮技術研究

PADS Layout和Router之間的同步模式解析
PADS AD Cadence轉換
虹科方案 | 如何破解CAN與車載以太網之間數據傳輸和協議轉換的難題?


 工商網監
工商網監
評論