 如何解決Spring Boot接口防刷
一,技術要點:Spring Boot的基本知識,Redis基本操作,首先是寫一個注解類:
import java.lang.annotation.Retention;
import java.lang.annotation.Target;
import static java.lang.annotation.ElementType.METHOD;
import static java.lang.annotation.RetentionPolicy.RUNTIME;
@Retention(RUNTIME)
@Target(METHOD)
public @interface AccessLimit {
int seconds();
int maxCount();
boolean needLogin()default true;
}
接著就是在Interceptor攔截器中實現:
import com.alibaba.fastjson.JSON;
import com.example.demo.action.AccessLimit;
import com.example.demo.redis.RedisService;
import com.example.demo.result.CodeMsg;
import com.example.demo.result.Result;
import org.springframework.beans.factory.annotation.Autowired;
import org.springframework.stereotype.Component;
import org.springframework.web.method.HandlerMethod;
import org.springframework.web.servlet.handler.HandlerInterceptorAdapter;
import javax.servlet.http.HttpServletRequest;
import javax.servlet.http.HttpServletResponse;
import java.io.OutputStream;
@Componentpublic class FangshuaInterceptor extends HandlerInterceptorAdapter {
@Autowired
private RedisService redisService;
@Override
public boolean preHandle(HttpServletRequest request, HttpServletResponse response, Object handler) throws Exception {
//判斷請求是否屬于方法的請求
if(handler instanceof HandlerMethod){
HandlerMethod hm = (HandlerMethod) handler;
//獲取方法中的注解,看是否有該注解
AccessLimit accessLimit = hm.getMethodAnnotation(AccessLimit.class);
if(accessLimit == null){
return true;
}
int seconds = accessLimit.seconds();
int maxCount = accessLimit.maxCount();
boolean login = accessLimit.needLogin();
String key = request.getRequestURI();
//如果需要登錄
if(login){
//獲取登錄的session進行判斷
//。..。.
key+=“”+“1”; //這里假設用戶是1,項目中是動態獲取的userId
}
//從redis中獲取用戶訪問的次數
AccessKey ak = AccessKey.withExpire(seconds);
Integer count = redisService.get(ak,key,Integer.class);
if(count == null){
//第一次訪問
redisService.set(ak,key,1);
}else if(count 《 maxCount){
//加1
redisService.incr(ak,key);
}else{
//超出訪問次數
render(response,CodeMsg.ACCESS_LIMIT_REACHED); //這里的CodeMsg是一個返回參數
return false;
}
}
return true;
}
private void render(HttpServletResponse response, CodeMsg cm)throws Exception {
response.setContentType(“application/json;charset=UTF-8”);
OutputStream out = response.getOutputStream();
String str = JSON.toJSONString(Result.error(cm));
out.write(str.getBytes(“UTF-8”));
out.flush();
out.close();
}
}
再把Interceptor注冊到springboot中
import com.example.demo.ExceptionHander.FangshuaInterceptor;
import org.springframework.beans.factory.annotation.Autowired;
import org.springframework.context.annotation.Configuration;
import org.springframework.web.servlet.config.annotation.InterceptorRegistry;
import org.springframework.web.servlet.config.annotation.WebMvcConfigurerAdapter;
@Configurationpublic class WebConfig extends WebMvcConfigurerAdapter {
@Autowired
private FangshuaInterceptor interceptor;
@Override
public void addInterceptors(InterceptorRegistry registry) {
registry.addInterceptor(interceptor);
}
}
接著在Controller中加入注解
import com.example.demo.result.Result;
import org.springframework.stereotype.Controller;
import org.springframework.web.bind.annotation.RequestMapping;
import org.springframework.web.bind.annotation.ResponseBody;
@Controllerpublic class FangshuaController {
@AccessLimit(seconds=5, maxCount=5, needLogin=true)
@RequestMapping(“/fangshua”)
@ResponseBody
public Result《String》 fangshua(){
return Result.success(“請求成功”);
}
責任編輯:haq
-
接口
+關注
關注
33文章
8691瀏覽量
151917 -
Sprint
+關注
關注
0文章
86瀏覽量
15194
原文標題:一個注解搞定 Spring Boot 接口防刷
文章出處:【微信號:AndroidPush,微信公眾號:Android編程精選】歡迎添加關注!文章轉載請注明出處。
發布評論請先 登錄
相關推薦
校園點餐訂餐外賣跑腿Java源碼

SSM開發環境的搭建教程 SSM與Spring Boot的區別
Spring 應用合并之路(二):峰回路轉,柳暗花明
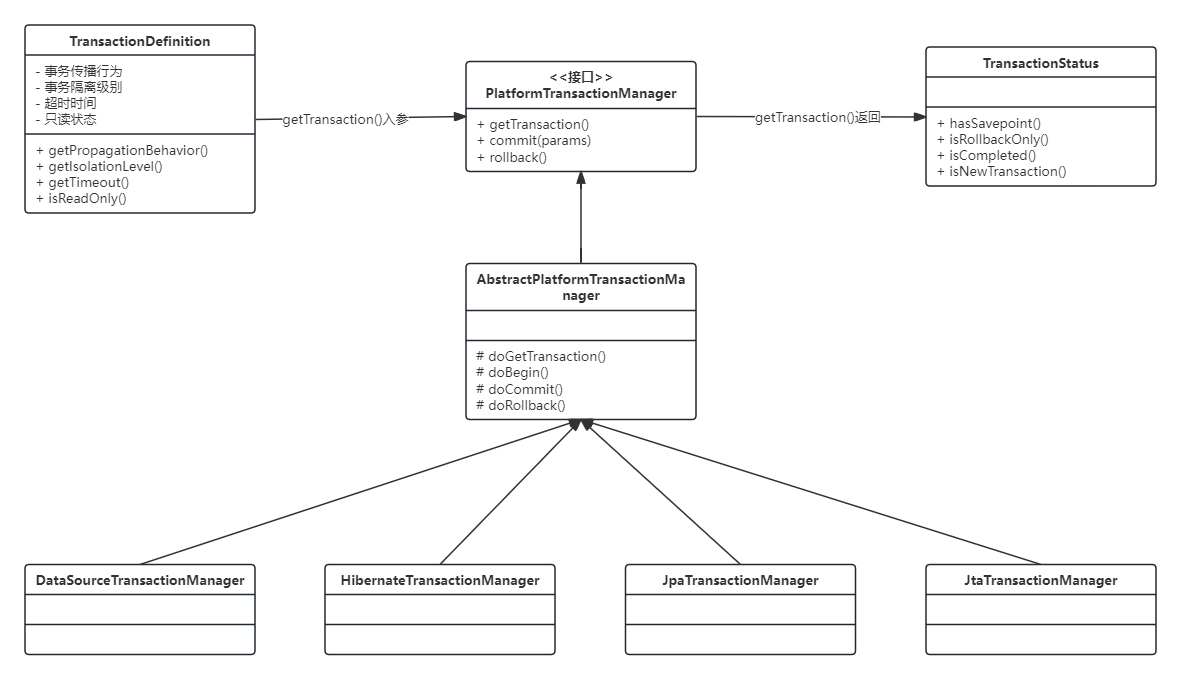
Spring事務實現原理
探索防抖光電云臺無刷馬達驅動方案的技術奧秘
Spring Cloud Gateway網關框架

單片機boot0和boot1怎么設置
stm32讀取boot引腳狀態
stm32boot0和boot1對應哪個p引腳
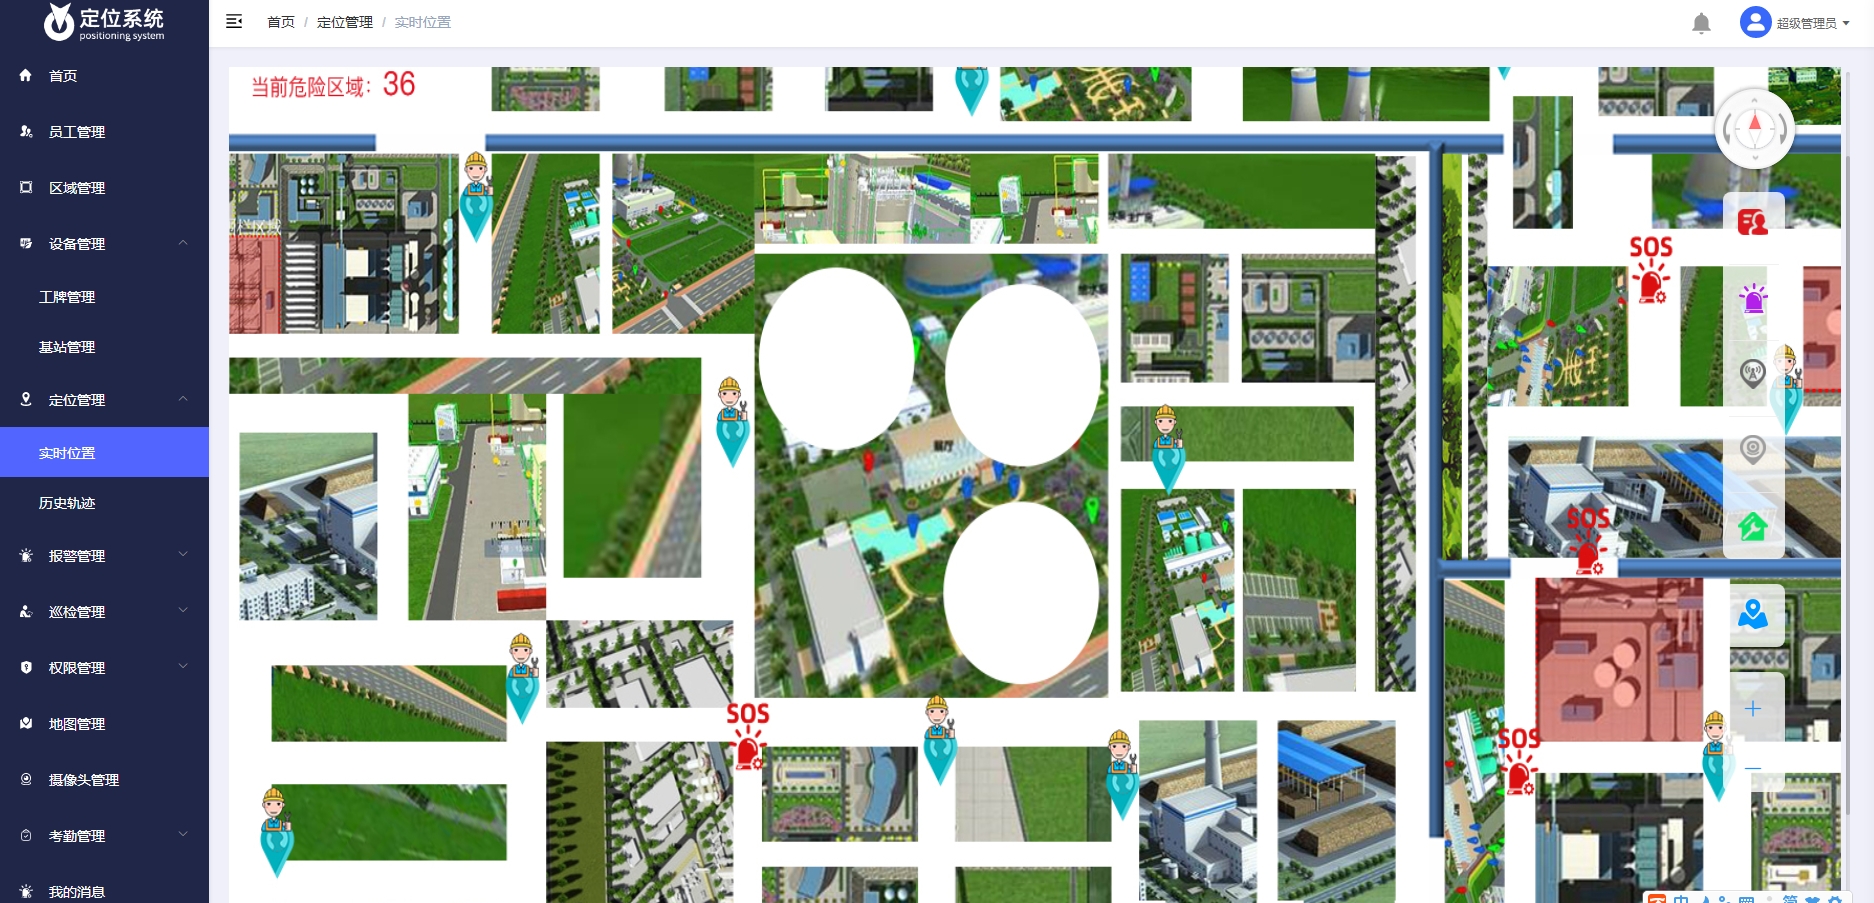
vue+spring boot人員定位系統源碼,實現實時定位、智慧調度、軌跡追蹤
二級BOOT啟動失敗的原因?
玩轉Spring狀態機

UWB室內外高精度一體化融合定位系統源碼 UWB技術定位系統應用場景 Java+Spring boot+MYSQL?技術開發


 工商網監
工商網監
評論