") 如何在LiDAR點(diǎn)云上進(jìn)行3D對(duì)象檢測(cè)
如何在LiDAR點(diǎn)云上進(jìn)行3D對(duì)象檢測(cè)
該項(xiàng)目將借助KV260上的PYNQ-DPU覆蓋,從而能夠使我們?cè)贚iDAR點(diǎn)云上進(jìn)行3D對(duì)象檢測(cè)比以往任何時(shí)候都更加高效!
背景
在構(gòu)建自動(dòng)駕駛汽車、自動(dòng)導(dǎo)航機(jī)器人和其他現(xiàn)實(shí)世界的應(yīng)用程序時(shí),環(huán)境感知起著不可或缺的作用。
為什么要在點(diǎn)云上進(jìn)行3D對(duì)象檢測(cè)?
雖然基于深度學(xué)習(xí)的相機(jī)數(shù)據(jù)二維對(duì)象檢測(cè)顯示出很高的準(zhǔn)確性,但它可能不是有效的活動(dòng),如定位、測(cè)量對(duì)象之間的距離和計(jì)算深度信息。
LiDAR傳感器生成的點(diǎn)云提供對(duì)象的3D信息,以更有效地定位對(duì)象并表征形狀。因此,點(diǎn)云上的3D對(duì)象檢測(cè)正在各種應(yīng)用中出現(xiàn),尤其是在自動(dòng)駕駛方面。
盡管如此,設(shè)計(jì)基于LiDAR的3D對(duì)象檢測(cè)系統(tǒng)仍具有挑戰(zhàn)性。首先,此類系統(tǒng)需要在模型推理中進(jìn)行大量計(jì)算。其次,由于點(diǎn)云數(shù)據(jù)是不規(guī)則的,處理管道需要預(yù)處理和后處理才能提供端到端的感知結(jié)果。
KV260與3D物體檢測(cè)系統(tǒng)完美匹配。模型推理的昂貴計(jì)算可以卸載到KV260的可編程邏輯部分并由其加速,而KV260強(qiáng)大的ARM內(nèi)核能夠處理預(yù)處理和后處理任務(wù)。
設(shè)計(jì)概述
我們現(xiàn)在討論選擇的用于點(diǎn)云上3D對(duì)象檢測(cè)的深度學(xué)習(xí)模型以及包括軟件和硬件的系統(tǒng)概述。
網(wǎng)絡(luò)架構(gòu)
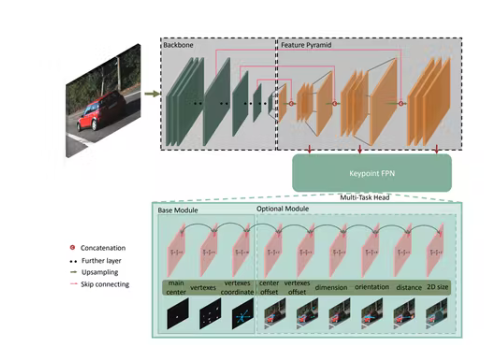
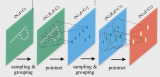
作為對(duì)現(xiàn)有工作的完整性檢查,我們選擇了基于ResNet的關(guān)鍵點(diǎn)特征金字塔網(wǎng)絡(luò)(KFPN),這是第一個(gè)在KITTI基準(zhǔn)上具有最先進(jìn)性能的單目3D檢測(cè)實(shí)時(shí)系統(tǒng)。特別是,我們采用了它在點(diǎn)云上的開源PyTorch實(shí)現(xiàn),稱為SFA3D。
KV260 上的 PYNQ-DPU
之所以我們使用Xilinx 開發(fā)板的 Ubuntu Desktop 20.04.3 LTS而不是 Petalinux 作為 KV260 上的操作系統(tǒng),是因?yàn)?Ubuntu 是一個(gè)很好的開發(fā)環(huán)境,用于安裝預(yù)處理點(diǎn)云和后處理結(jié)果所需的軟件包。另一方面,KV260 對(duì) Pynq 和 DPU 覆蓋的支持避免了從頭設(shè)計(jì)高效的 DPU,使我們能夠在 python 環(huán)境下工作。這在很大程度上簡(jiǎn)化了基于 CPU/GPU 的深度學(xué)習(xí)實(shí)現(xiàn)向 KV260 的遷移。
設(shè)置環(huán)境
按照官方指南將Ubuntu鏡像安裝到KV260,然后參考Github在Ubuntu操作系統(tǒng)中安裝Pynq 。Git 通過(guò)執(zhí)行以下命令克隆所有必需的文件并將所需的包安裝到板上。
git clone https://github.com/SoldierChen/DPU-Accelerated-3D-Object-Detection-on-Point-Clouds.git
cd DPU-Accelerated-3D-Object-Detection-on-Point-Clouds
pip install -r requirements.txt
在這里,我們需要 Pytorch 1.4,因?yàn)?Pynq DPU 的 VART 是 v1.4。
數(shù)據(jù)準(zhǔn)備
需要下載的數(shù)據(jù)包括:
Velodyne 點(diǎn)云(29 GB)
對(duì)象數(shù)據(jù)集的訓(xùn)練標(biāo)簽(5 MB)
對(duì)象數(shù)據(jù)集的相機(jī)校準(zhǔn)矩陣(16 MB)
對(duì)象數(shù)據(jù)集的左側(cè)彩色圖像(12 GB) (僅用于可視化目的)
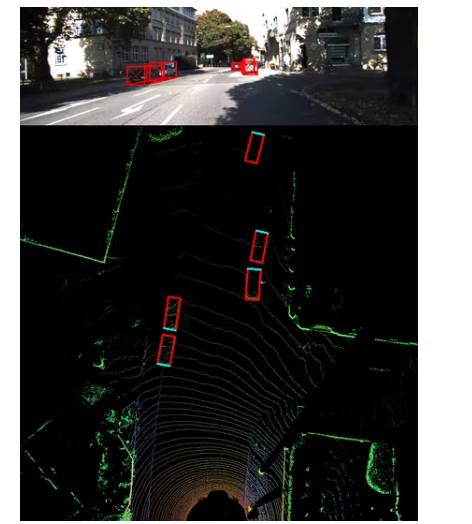
要使用 3D 框可視化 3D 點(diǎn)云,讓我們執(zhí)行:
cd model_quant_compile/data_process/
python kitti_dataset.py
模型訓(xùn)練
python train.py --gpu_idx 0
該命令使用一個(gè) GPU 進(jìn)行訓(xùn)練,但它支持分布式訓(xùn)練。此外,您可以選擇 fpn_resnet 或 resnet 作為目標(biāo)模型。訓(xùn)練后的模型將存儲(chǔ)在名為“Model_restnet/fpn_resnet_epoch_#”的檢查點(diǎn)文件夾中。根據(jù)您的硬件,epoch 可以從 10 到 300,精度越高越好。
模型量化和編譯
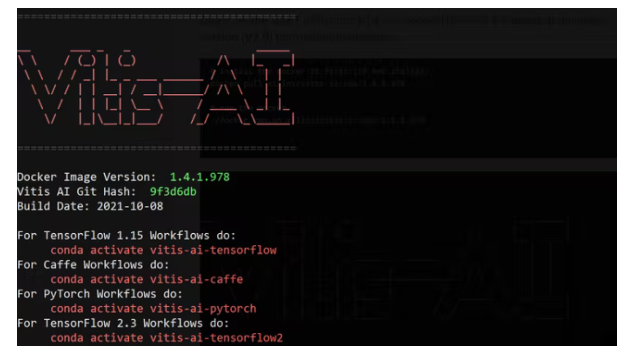
同樣,由于 Pynq 的 VART 是 V1.4,我們需要 VITIS AI v1.4 而不是最新版本(V2.0)來(lái)進(jìn)行模型量化。
# install the docker at first (if not stalled)
docker pull xilinx/vitis-ai-cpu:1.4.1.978
# run the docker
./docker_run.sh xilinx/vitis-ai-cpu:1.4.1.978
然后我們使用以下命令量化模型:
# activate the pytorch environment
conda activate vitis-ai-pytorch
# install required packages
pip install -r requirements.txt
# configure the quant_mode to calib
ap.add_argument('-q', '--quant_mode', type=str, default='calib', choices=['calib','test'], help='Quantization mode (calib or test). Default is calib')
# here, it quantize the example model: Model_resnet_18_epoch_10.pth
python quantize.py
# configure the quant_mode to test
ap.add_argument('-q', '--quant_mode', type=str, default='test', choices=['calib','test'], help='Quantization mode (calib or test). Default is calib')
# here, it outputs the quantized model.
python quantize.py
接下來(lái),我們將編譯模型:
./compile.sh zcu102 build/
不要介意 zcu102 與 KV260 共享相同的 DPU 架構(gòu)。您將看到成功編譯的以下消息:
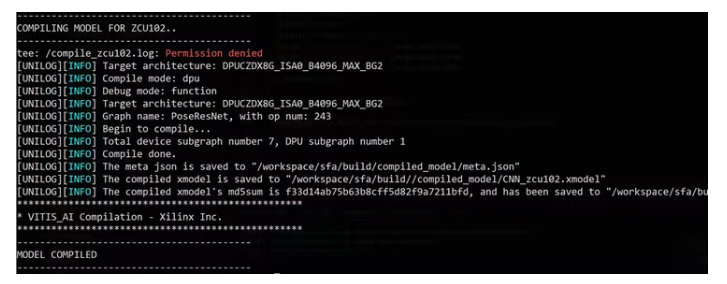
到目前為止,我們得到了可以在 DPU 上執(zhí)行的編譯 xmodel,在 KV260 上過(guò)度執(zhí)行。接下來(lái),我們將其部署在板上并開發(fā)應(yīng)用程序代碼。
KV260部署
按照官方指南,我們先在KV260上搭建好Ubuntu操作系統(tǒng)。然后,我們按照PYNQ-DPU GitHub在板上安裝 python 。
搭建好板子后,我們需要安裝git,將代碼克隆到板子上,并將編譯好的xmodel復(fù)制到文件夾中。
應(yīng)用程序代碼設(shè)計(jì)
這里我們將介紹如何調(diào)用并與 DPU 接口進(jìn)行推理。
我們首先加載 DPU 覆蓋和自定義的 xmodel。然后,重要的是,必須知道輸入和輸出張量信息才能與數(shù)據(jù)集協(xié)調(diào)。在這里,我們只有一個(gè)張量作為輸入,五個(gè)張量作為輸出。相應(yīng)地分配輸入和輸出緩沖區(qū)。
# load model and overly
overlay = DpuOverlay("dpu.bit")
overlay.load_model("./CNN_zcu102.xmodel")
dpu = overlay.runner
# get tensor information
inputTensors = dpu.get_input_tensors()
outputTensors = dpu.get_output_tensors()
shapeIn = tuple(inputTensors[0].dims)
outputSize = int(outputTensors[0].get_data_size() / shapeIn[0])
shapeOut = tuple(outputTensors[0].dims)
shapeOut1 = tuple(outputTensors[1].dims)
shapeOut2 = tuple(outputTensors[2].dims)
shapeOut3 = tuple(outputTensors[3].dims)
shapeOut4 = tuple(outputTensors[4].dims)
# allocate input and output buffers.
# Note the output is a list of five tensors.
output_data = [np.empty(shapeOut, dtype=np.float32, order="C"),
np.empty(shapeOut1, dtype=np.float32, order="C"),
np.empty(shapeOut2, dtype=np.float32, order="C"),
np.empty(shapeOut3, dtype=np.float32, order="C"),
np.empty(shapeOut4, dtype=np.float32, order="C")]
# the input is only one tensor.
input_data = [np.empty(shapeIn, dtype=np.float32, order="C")]
image = input_data[0]
一次性推理的過(guò)程封裝在下面的函數(shù)中。在這里,我們將輸入張量置換為 DPU 輸入張量的形狀,并將張量置換為后處理所需的形狀。這對(duì)于正確的結(jié)果至關(guān)重要。
def do_detect(dpu, shapeIn, image, input_data, output_data, configs, bevmap, is_front):
if not is_front:
bevmap = torch.flip(bevmap, [1, 2])
input_bev_maps = bevmap.unsqueeze(0).to("cpu", non_blocking=True).float()
# do permutation
input_bev_maps = input_bev_maps.permute(0, 2, 3, 1)
image[0,...] = input_bev_maps[0,...] #.reshape(shapeIn[1:])
job_id = dpu.execute_async(input_data, output_data)
dpu.wait(job_id)
# convert the output arrays to tensors for the following post-processing.
outputs0 = torch.tensor(output_data[0])
outputs1 = torch.tensor(output_data[1])
outputs2 = torch.tensor(output_data[2])
outputs3 = torch.tensor(output_data[3])
outputs4 = torch.tensor(output_data[4])
# do permutation
outputs0 = outputs0.permute(0, 3, 1, 2)
outputs1 = outputs1.permute(0, 3, 1, 2)
outputs2 = outputs2.permute(0, 3, 1, 2)
outputs3 = outputs3.permute(0, 3, 1, 2)
outputs4 = outputs4.permute(0, 3, 1, 2)
outputs0 = _sigmoid(outputs0)
outputs1 = _sigmoid(outputs1)
# post-processing
detections = decode(
outputs0,
outputs1,
outputs2,
outputs3,
outputs4, K=configs.K)
detections = detections.cpu().numpy().astype(np.float32)
detections = post_processing(detections, configs.num_classes, configs.down_ratio, configs.peak_thresh)
return detections[0], bevmap
在 KV260 上執(zhí)行
通過(guò)運(yùn)行以下命令,將在 DPU 上執(zhí)行演示數(shù)據(jù)的推理:
python demo_2_sides-dpu.py
然后運(yùn)行以下命令:
pythondemo_front-dpu.py
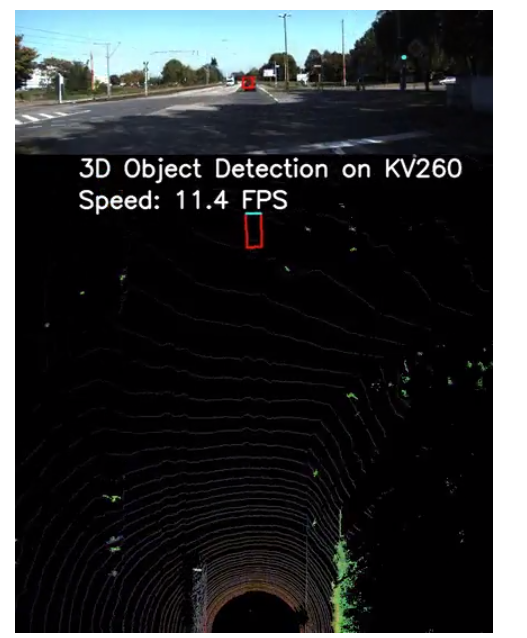
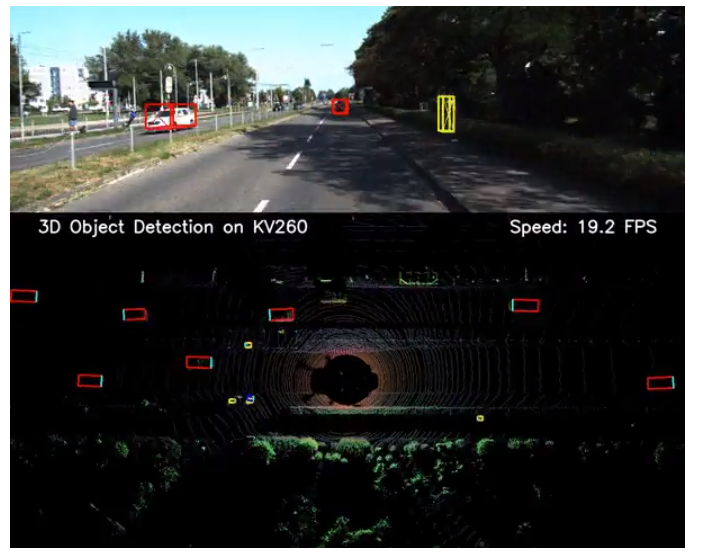
性能范圍從10到20FPS,比在服務(wù)器級(jí)CPU(IntelXeonGold6226R)上的執(zhí)行速度快100到200倍。
結(jié)論
總之,我們展示了在KV260上使用AMD-XilinxDPU來(lái)加速基于點(diǎn)云的3D對(duì)象檢測(cè)是多么容易。為了進(jìn)一步提升性能,我們計(jì)劃通過(guò)使用多個(gè)DPU實(shí)例來(lái)優(yōu)化模型推理階段,以及通過(guò)使用多線程和批處理來(lái)優(yōu)化預(yù)處理和后處理階段。
-
3D
+關(guān)注
關(guān)注
9文章
2910瀏覽量
107991 -
LIDAR
+關(guān)注
關(guān)注
10文章
328瀏覽量
29530
發(fā)布評(píng)論請(qǐng)先 登錄
相關(guān)推薦
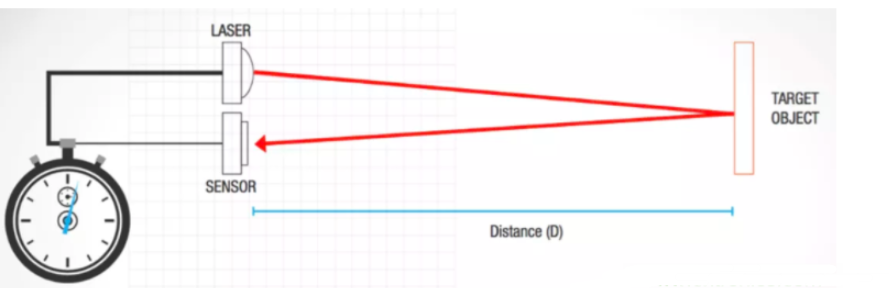
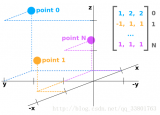
LiDAR如何構(gòu)建3D點(diǎn)云?如何利用LiDAR提供深度信息
基于3D點(diǎn)云的多任務(wù)模型在板端實(shí)現(xiàn)高效部署
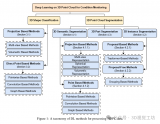
基于深度學(xué)習(xí)的方法在處理3D點(diǎn)云進(jìn)行缺陷分類應(yīng)用
制作3D 對(duì)象,然后顯示。 導(dǎo)入3D對(duì)象 ,然后顯示。
如何同時(shí)獲取2d圖像序列和相應(yīng)的3d點(diǎn)云?
3D點(diǎn)云技術(shù)介紹及其與VR體驗(yàn)的關(guān)系
點(diǎn)云問(wèn)題的介紹及3D點(diǎn)云技術(shù)在VR中的應(yīng)用
如何在PADS 3D Layout中進(jìn)行命令操作

基于圖卷積的層級(jí)圖網(wǎng)絡(luò)用于基于點(diǎn)云的3D目標(biāo)檢測(cè)
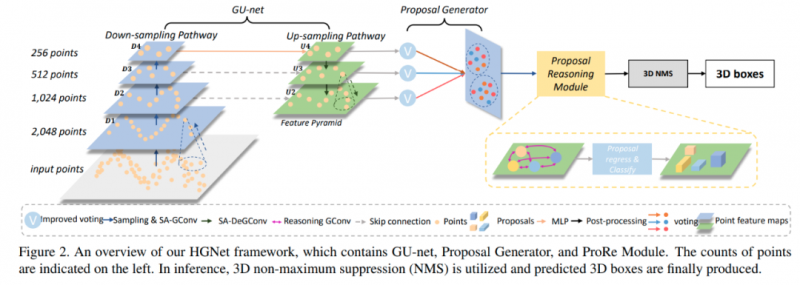
基于層級(jí)圖網(wǎng)絡(luò)的圖卷積,用點(diǎn)云完成3D目標(biāo)檢測(cè)
何為3D點(diǎn)云語(yǔ)義分割
3D點(diǎn)云數(shù)據(jù)集在3D數(shù)字化技術(shù)中的應(yīng)用
基于點(diǎn)云的3D障礙物檢測(cè)介紹
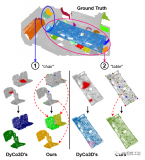
基于深度學(xué)習(xí)的3D點(diǎn)云實(shí)例分割方法
兩種應(yīng)用于3D對(duì)象檢測(cè)的點(diǎn)云深度學(xué)習(xí)方法


 工商網(wǎng)監(jiān)
評(píng)論