 RT-Thread CAN驅動
沁恒CH32x RT-Thread驅動添加適配CH32V208驅動-電子發燒友網 (elecfans.com)
在這個基礎上,我增加了適配CAN的驅動,接著就可以篇寫CAN驅動,來實現數據收發了。
配置
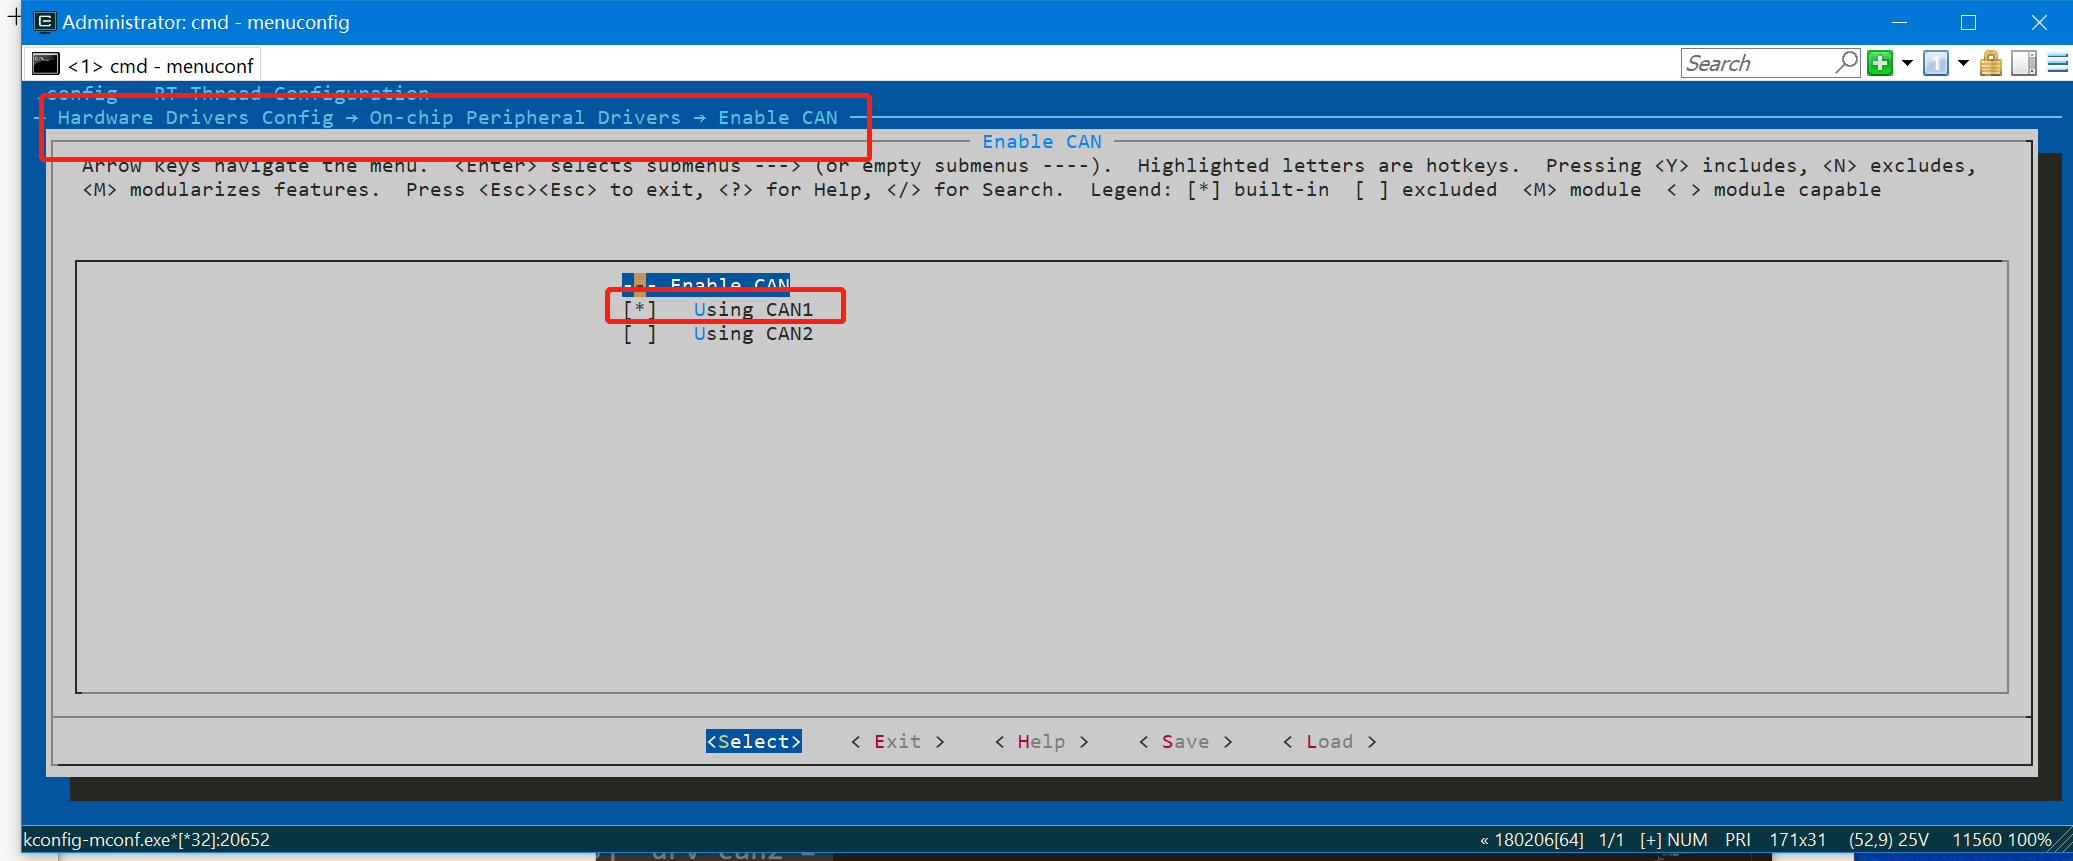
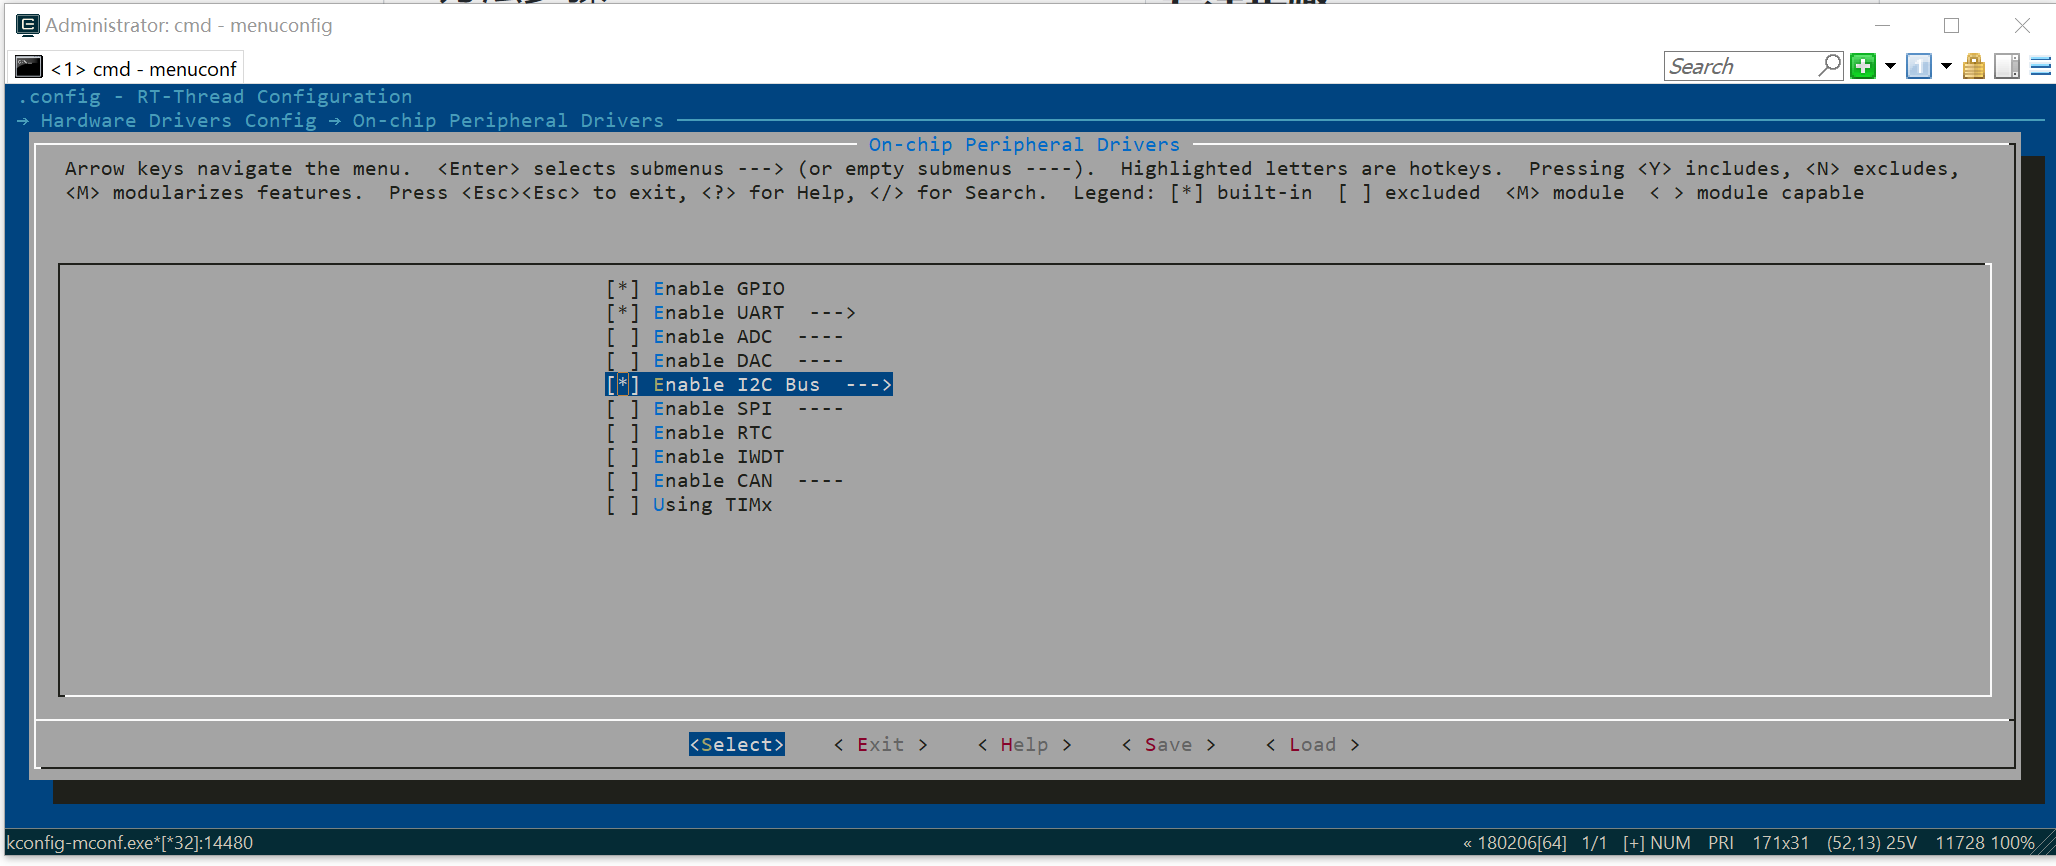
- 打開env工具,輸入menuconfig,打開圖形配置界面,選擇Hardware Drivers Conifg---->On-chip Peripheral Drivers-->Enable CAN-->啟動Using CAN1
- 添加 can測試文件。用vscode打開rtthread目錄添加can_sample.c函數如下:
/*
 * Copyright (c) 2006-2021, RT-Thread Development Team
 *
 * SPDX-License-Identifier: Apache-2.0
 *
 * Change Logs:
 * Date           Author       Notes
 * 2023-02-01     Administrator       the first version
 */
/*
 * 程序清單:這是一個 CAN 設備使用例程
 * 例程導出了 can_sample 命令到控制終端
 * 命令調用格式:can_sample can1
 * 命令解釋:命令第二個參數是要使用的 CAN 設備名稱,為空則使用默認的 CAN 設備
 * 程序功能:通過 CAN 設備發送一幀,并創建一個線程接收數據然后打印輸出。
*/

#include
#include "rtdevice.h"

#define CAN_DEV_NAME       "can1"      /* CAN 設備名稱 */
static struct rt_semaphore rx_sem;     /* 用于接收消息的信號量 */
static rt_device_t can_dev;            /* CAN 設備句柄 */
/* 接收數據回調函數 */
static rt_err_t can_rx_call(rt_device_t dev, rt_size_t size)
{
    /* CAN 接收到數據后產生中斷,調用此回調函數,然后發送接收信號量 */
    rt_sem_release(&rx_sem);

    return RT_EOK;
}

int can_send(rt_uint32_t humi,rt_uint32_t temp)
{
    struct rt_can_msg msg = {0};
    rt_err_t res;
    rt_size_t  size;
    msg.id = 0x78;              /* ID 為 0x78 */
       msg.ide = RT_CAN_STDID;     /* 標準格式 */
       msg.rtr = RT_CAN_DTR;       /* 數據幀 */
       msg.len = 8;                /* 數據長度為 8 */
       /* 待發送的 8 字節數據 */
       msg.data[0] = (uint8_t)(temp/100);
       msg.data[1] = (uint8_t)(temp%100);
       msg.data[2] = (uint8_t)(humi/100);
       msg.data[3] = (uint8_t)(humi%100);
       msg.data[4] = 0x44;
       msg.data[5] = 0x55;
       msg.data[6] = 0x66;
       msg.data[7] = 0x77;
       /* 發送一幀 CAN 數據 */
       size = rt_device_write(can_dev, 0, &msg, sizeof(msg));
       if (size == 0)
       {
           rt_kprintf("can dev write data failed!
");
       }

       return res;
}

static void can_rx_thread(void *parameter)
{
    int i;
    rt_err_t res;
    struct rt_can_msg rxmsg = {0};

    /* 設置接收回調函數 */
    rt_device_set_rx_indicate(can_dev, can_rx_call);

#ifdef RT_CAN_USING_HDR
    struct rt_can_filter_item items[5] =
    {
        RT_CAN_FILTER_ITEM_INIT(0x100, 0, 0, 0, 0x700, RT_NULL, RT_NULL), /* std,match ID:0x100~0x1ff,hdr 為 - 1,設置默認過濾表 */
        RT_CAN_FILTER_ITEM_INIT(0x300, 0, 0, 0, 0x700, RT_NULL, RT_NULL), /* std,match ID:0x300~0x3ff,hdr 為 - 1 */
        RT_CAN_FILTER_ITEM_INIT(0x211, 0, 0, 0, 0x7ff, RT_NULL, RT_NULL), /* std,match ID:0x211,hdr 為 - 1 */
        RT_CAN_FILTER_STD_INIT(0x486, RT_NULL, RT_NULL),                  /* std,match ID:0x486,hdr 為 - 1 */
        {0x555, 0, 0, 0, 0x7ff, 7,}                                       /* std,match ID:0x555,hdr 為 7,指定設置 7 號過濾表 */
    };
    struct rt_can_filter_config cfg = {5, 1, items}; /* 一共有 5 個過濾表 */
    /* 設置硬件過濾表 */
    res = rt_device_control(can_dev, RT_CAN_CMD_SET_FILTER, &cfg);
    RT_ASSERT(res == RT_EOK);
#endif

    while (1)
    {
        /* hdr 值為 - 1,表示直接從 uselist 鏈表讀取數據 */
        rxmsg.hdr_index = -1;
        /* 阻塞等待接收信號量 */
        rt_sem_take(&rx_sem, RT_WAITING_FOREVER);
        /* 從 CAN 讀取一幀數據 */
        rt_device_read(can_dev, 0, &rxmsg, sizeof(rxmsg));
        /* 打印數據 ID 及內容 */
        rt_kprintf("ID:%x", rxmsg.id);
        for (i = 0; i < 8; i++)
        {
            rt_kprintf("%2x", rxmsg.data[i]);
        }
        rt_kprintf("recv end
");
    }
}

int can_sample(void)
{
    struct rt_can_msg msg = {0};
    rt_err_t res;
    rt_size_t  size;
    rt_thread_t thread;
    char can_name[RT_NAME_MAX];

    rt_strncpy(can_name, CAN_DEV_NAME, RT_NAME_MAX);

    /* 查找 CAN 設備 */
    can_dev = rt_device_find(can_name);
    if (!can_dev)
    {
        rt_kprintf("find %s failed!
", can_name);
        return RT_ERROR;
    }

    /* 初始化 CAN 接收信號量 */
    rt_sem_init(&rx_sem, "rx_sem", 0, RT_IPC_FLAG_FIFO);
    /* 設置 CAN 通信的波特率為 500kbit/s*/
    res = rt_device_control(can_dev, RT_CAN_CMD_SET_BAUD, (void *)CAN500kBaud);
    /* 以中斷接收及發送方式打開 CAN 設備 */
    res = rt_device_open(can_dev, RT_DEVICE_FLAG_INT_TX | RT_DEVICE_FLAG_INT_RX);

    RT_ASSERT(res == RT_EOK);
    /* 創建數據接收線程 */
    thread = rt_thread_create("can_rx", can_rx_thread, RT_NULL, 2056, 25, 10);
    if (thread != RT_NULL)
    {
        rt_thread_startup(thread);
    }
    else
    {
        rt_kprintf("create can_rx thread failed!
");
    }

    msg.id = 0x78;              /* ID 為 0x78 */
    msg.ide = RT_CAN_STDID;     /* 標準格式 */
    msg.rtr = RT_CAN_DTR;       /* 數據幀 */
    msg.len = 8;                /* 數據長度為 8 */
    /* 待發送的 8 字節數據 */
    msg.data[0] = 0x00;
    msg.data[1] = 0x11;
    msg.data[2] = 0x22;
    msg.data[3] = 0x33;
    msg.data[4] = 0x44;
    msg.data[5] = 0x55;
    msg.data[6] = 0x66;
    msg.data[7] = 0x77;
    /* 發送一幀 CAN 數據 */
    size = rt_device_write(can_dev, 0, &msg, sizeof(msg));
    if (size == 0)
    {
        rt_kprintf("can dev write data failed!
");
    }

    rt_kprintf("can dev write data OK !
");
    return res;
}
/* 導出到 msh 命令列表中 */
MSH_CMD_EXPORT(can_sample, can device sample);
- 在env工具中輸入scons執行編譯:

- 然后打開wchisp工具把rtthread.bin下載到開發板:

- 用CAN轉TTL連接到CAN分析儀上,打開調試軟件,以及msh終端:


【總結】
雖然wch在rtthread的驅動沒有更新,但是經過我的修復,順利的完成CAN的測試工作。
審核編輯:湯梓紅
聲明:本文內容及配圖由入駐作者撰寫或者入駐合作網站授權轉載。文章觀點僅代表作者本人,不代表電子發燒友網立場。文章及其配圖僅供工程師學習之用,如有內容侵權或者其他違規問題,請聯系本站處理。
舉報投訴
-
CAN
+關注
關注
57文章
2769瀏覽量
464380 -
開發板
+關注
關注
25文章
5121瀏覽量
98193 -
RTT
+關注
關注
0文章
65瀏覽量
17217 -
RT-Thread
+關注
關注
31文章
1305瀏覽量
40386
發布評論請先 登錄
相關推薦
RT-Thread上CAN實踐
開箱測試RT-Thread官方已完成了對英飛凌XMC7200EVK的移植,通過shell可以看到做好了uart3的console。本文將介紹如何進行RT-ThreadCan移植。接下來我們要完成CAN_FD的

RT-Thread NUC97x 移植 LVGL
不涉及 rt-thread 驅動,但是它是 LVGL 和 rt-thread 的接口。LVGL 在 rt-thread 上運行的基石。
發表于 07-08 09:37
?1516次閱讀
基于RT-Thread CAN驅動框架實現開發板和CAN調試器進行CAN通信驗證
1、基于rt-thread CAN驅動框架通信評測步驟 本章通過ENV環境配置M2354片上外設CAN的功能,Keil Arm編譯,基于rt-th
發表于 11-15 16:27
RT-Thread編程指南
RT-Thread編程指南——RT-Thread開發組(2015-03-31)。RT-Thread做為國內有較大影響力的開源實時操作系統,本文是RT-Thread實時操作系統的編程指南
發表于 11-26 16:06
?0次下載
RT-Thread上的CAN總線介紹以及驅動編寫
昨晚很榮幸邀請到李工在RT-Thread微信群進行RT-Thread上的CAN驅動和應用講座。小編整理了講座內容,特發出講義以供享用。
RT-Thread Studio驅動SD卡
RT-Thread Studio驅動SD卡前言一、創建基本工程1、創建Bootloader2、創建項目工程二、配置RT-Thread Settings三、代碼分析1.引入庫2.讀入數據四、效果驗證
發表于 12-27 19:13
?20次下載

【RT-Thread開源作品秀】基于RT-Thread的星務平臺研究
本作品為了驗證星務軟件在RT-Thread系統運行的可行性,底層是否能夠驅動星務軟件,同時擴展RT-Thread應用范圍。ART-Pi作為衛星下位機,...
發表于 01-25 18:26
?6次下載
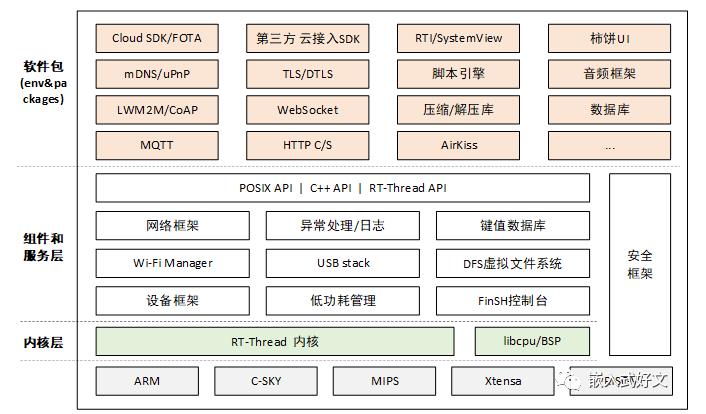
RT-Thread學習筆記 RT-Thread的架構概述
RT-Thread 簡介 作為一名 RTOS 的初學者,也許你對 RT-Thread 還比較陌生。然而,隨著你的深入接觸,你會逐漸發現 RT-Thread 的魅力和它相較于其他同類型 RTOS
RT-Thread文檔_RT-Thread 潘多拉 STM32L475 上手指南
RT-Thread文檔_RT-Thread 潘多拉 STM32L475 上手指南
發表于 02-22 18:23
?9次下載
基于RT-Thread的CAN電機驅動板設計(一)需求分析與硬件設計
本項目依托實驗室機器人比賽,需要設計一個電機驅動板,控制8個CAN協議的伺服電機。為了鍛煉我對RT-Thread的使用能力同時加快開發進度,減少花費在驅動代碼上的時間,電機
發表于 03-17 13:53
?1次下載


 工商網監
工商網監
評論